|
|
|
Web sharing |
|
DEVONthink allows you to give others on the local network access to your databases using a standard web browser on any operating system (including Windows and Linux). Perhaps you're running DEVONthink in a corporate situation and want to give workers controlled access to some databases you have. In an educational setting, classroom resources could be available to students. Academic or creative collaborators contribute to a common database, even if they're not all Mac users. The embedded web server in the Server edition provides an interactive web interface that allows your users to interact with the shared databases. Here are the steps to getting started using this powerful feature.
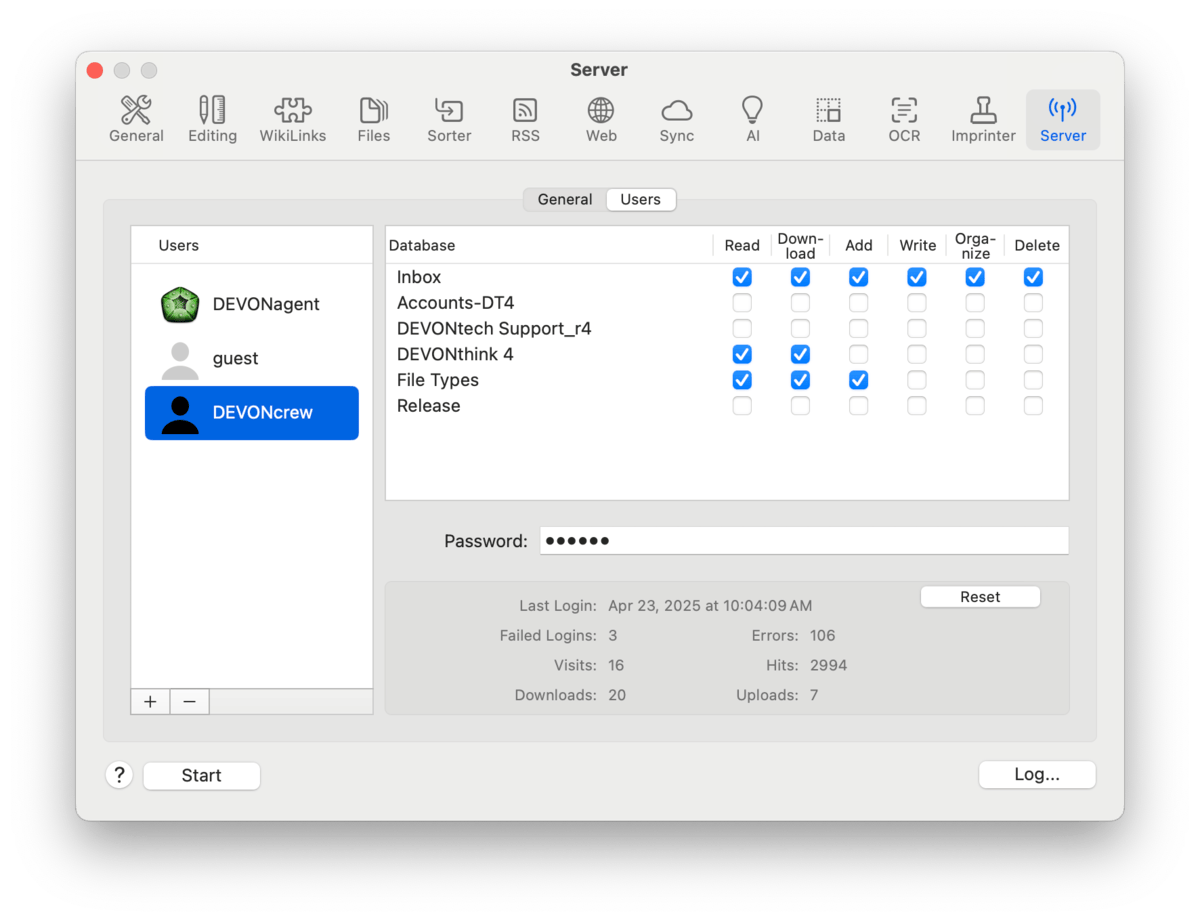
Setting It Up DEVONthink's web server runs on macOS inside our application. It is not a separate process. This means you need to install and run it on a Mac that is on and awake when people need access to it. Many times this is a dedicated Mac mini. Regarding databases, it only makes available databases you have open, though you can control who has access to them. Fortunately, getting things up and running is typically a fairly simple thing. 1. Open your databases: Whatever databases you need to make available, open them. Don't imagine you need to open and close certain ones for certain people. That is managed in the settings. 2. Set up the server: The Server > General settings are not complicated, though administered networks, e.g., corporate/academic networks, may require IT's involvement. However, this is typically a one-time setup, unless changes are required in the future. Two things to consider are setting a specific Bonjour Name and Bonjour Port. The name just makes things more easily identifiable to the end user, though it's not critical if you're sharing an IP-based URL. We do recommend specifying a port number. This makes for a consistent point of access for your users. If you don't specify one, a random unused port will be used every time the server launches. Certificates: Another thing to think about is the TLS certificate, assuring the server is legitimate to your end users . Where you obtain one is up to you but you need to obtain a file you can import via the Load P12/PFX file button. Self-signed: While we don't advocate one way or the other, there is the possibility of creating a certificate directly in DEVONthink. Click the Create self-signed certificate button then select Self-signed certificates will often show warnings in a browser that a certificate is unknown or invalid. But you can manually set the trust level to avoid the warning:
3. Add users: First decide who needs access and how granular that access is. For example, it could be sufficient to have a department account, e.g., Shipping with a single login and password. Or you could set up individual logins, say for the head of Human Resources. Secondly, you decide what permissions on what databases these users have. For example, a student may have read-only access to a classroom database while the teacher has all permissions. Additionally, if no permissions are granted to an individual for a certain database, it won't be visible in the web interface. Also, be aware no one will have permissions to write to, i.e., modify file contents, in an audit-proof database. 4. Start the server: Once all the users and their permissions are established, press the Start button. You can also select the Tools > Start Server command or choose the Start Server command in DEVONthink's dock icon. If the server is running, these will display Stop instead. At the bottom of the Settings window you will see two URLs: one is IP-based, the other uses the Bonjour name. We don't dictate which to use and both give the same access. 5. Invite the users: You will need to share the URL to any user who needs access. How you disseminate that is up to you and the channels of communication you feel are appropriate. You can click and open the URL in a browser, Control-click it in the Settings window and either copy or share it, or you can drag and drop it into other applications. Also, you may need to provide a certificate to them as well. We recommend the end-user adds the URL as bookmark in their browser so they can quickly access it in the future, as needed. This is also why setting a specific port is a good idea. Now the users should be able to login with their provided credentials and use the databases they have been granted access to. And during normal operation, the only steps you as the administrator may need to do occasionally is stopping and starting the server to add, remove, or modify users.
Common Questions How many licenses am I going to need?: This may be surprising but the answer is: one. The only license you need is for the Mac running the Server edition. You don't need to purchase per-user licenses. How many people can connect?: The built-in web server is not designed to become a user-facing portal on the Internet for thousands of daily users. It is ideally used on a local network with the possibility of remote connections (see below). There is no stated maximum number of concurrent users. Is there feature parity with the desktop app?: The answer is no as it's technologically infeasible. The web interface is limited by web technologies in a browser and a browser is also no match for the heavy-lifting our desktop app does daily. That being said, it is very functional for many groups of people across the world.
Using the Web Interface The interactive web interface imitates the look-and-feel of DEVONthink in many ways, but in a condensed form. Contrary to a static web site, it only loads once; clicking buttons or links does not reload the whole page but dynamically updates it. While a simpler interface than our desktop application, it provides useful access in many situations. You can also find descriptions of the controls in the Web Sharing section of the Windows chapter. Similar to the DEVONthink, the web interface is divided into panes: sidebar, item list, and view/edit pane, etc. However, some operations, e.g., deleting or organizing items, are logically dependent on the per-user permissions. Sidebar: The sidebar is where you can navigate the databases' inboxes, groups, tags, and trashes in the sidebar. You can drag items from the item list to reorganize things. Control-clicking an item here gives you the option to make a new group or RSS feed, delete or rename a group, or empty the Trash. Item List: Selecting items in the sidebar will display the contents in the item list. The list can be sorted by clicking the column headers. While they can't be reordered, you can enable or disable them in the context menu of the headers. If you move your cursor between the section headers, a separator will appear. Click and drag it to resize the columns. Double-click groups to display their contents in the item list. For quick navigation, press the < arrow to go back to previously visited locations. Click to select items or hold the ⌘ Command key to select multiple items. This applies to contiguous and non-contiguous selections. Selected items can be dragged and dropped, e.g., into groups in the item list or in the sidebar. You can also access commands in the context menu when you Control-click in the item list. This is a quick way to add a new file. View/Edit pane: Displayed below the item list, this pane will display the contents of compatible files. Due to the limitations of browser technologies, some file types can't be displayed. Clicking and dragging the divider bar allows you to resize the pane. A select number of file types, e.g., plain text, formatted notes, and Markdown files can be viewed and edited in this pane. Search: Searching the viewable databases can be done in the search field. Enter search terms, including using search prefixes to focus the searches. For example, you can do a search for Toolbar: In addition to the search field, the toolbar has a few other options. The new document menu lets you create a new native document or upload one from the Finder. Quickly move a selected item to the database's Trash with its own button. The Action menu lets you do a few things: copy the item link or URL of a selected item, open the Generic info inspector with Get Info, download the document to your device, or move it to the Trash. The User menu allows you to switch between English and German language, from light to dark mode, and also provides a Log Out option. Lastly, click the Info button to open the inspectors. Info Inspectors: The Generic inspector on the right displays basic metadata about the selected item, with certain attributes being editable, e.g, Tags or Label. The Data inspector lets you view and edit custom metadata applied to the selected document. See Also: The next view is the See Also inspector, displaying potentially related files in the current database you are viewing. Clicking on a match displays it in the view/edit pane. Note the original document is always the top match, so you can return to the original document by clicking it at the top of the inspector. Accessing Your Data Over the Internet Web sharing is best used on a local area network (LAN). But there may be situations where you want to share the database to users that aren't on your network. While we can't provide specific support due to the differences in equipment and environments, we have provided a simple guide that may prove useful. To access your database from outside your network, you need to make your Mac "visible" to the outside world. In general, your computer is connected to the Internet through a router. Routers create an intranet that your Mac is connected to and "route" traffic between the internet and your personal intranet. Now, you need to create a route from the outside leading to the Mac sharing your database. This offers a port on the outside that is directly connected to the port on which DEVONthink is publishing. If everything goes well, you will be able to access your database using an address like: Port forwarding done manually: The following is only a rough outline of the steps needed to configure port forwarding manually. The precise way to do it varies from router to router. You will need to consult the manual for your router in order to determine exactly how to set things up. To configure port forwarding, follow these steps:
Setting up port forwarding can be tricky, but the difficult part is mainly in determining how to configure your particular router. If you are in doubt, search online for your router's name and combine it with a search for "port forwarding" or "port mapping." |